
How to Get Started with Shopper.com as a Content Creator?
Discover Shopper.com: the ultimate online store for creators, publishers, and marketers. Learn how to manage and monetize affiliate product promotions at scale.
In today's digital landscape, content creators have the incredible opportunity to harness their creativity and reach a global audience like never before. Whether you're a seasoned influencer, a dedicated publisher, or a savvy marketer, one thing remains constant: the importance of effective monetization strategies. That's where Shopper.com comes into play.
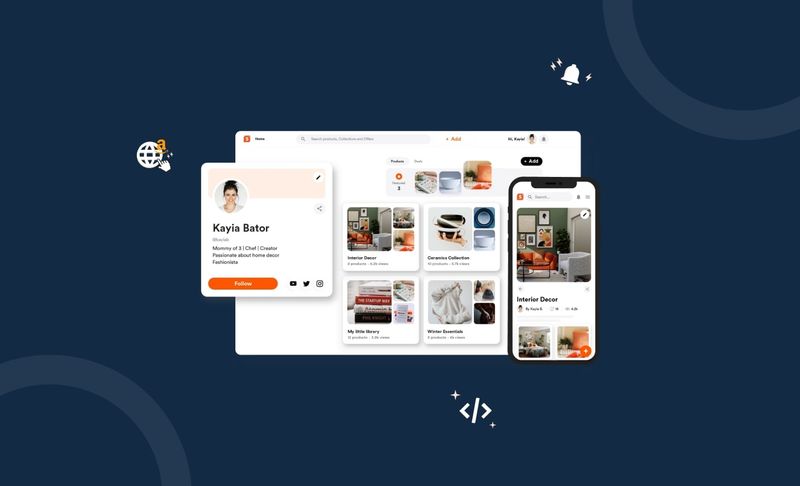
Shopper.com is an innovative online store designed specifically for content creators, publishers, and marketers seeking to manage and monetize their affiliate product promotions at scale. With over 25,000 affiliate partnerships across a wide range of brands, this platform empowers creators to not only enhance their content but also maximize their earning potential.
In this comprehensive guide, we will walk you through the process of getting started with Shopper.com and provide you with valuable insights into its powerful features. Whether you're new to the platform or looking to optimize your existing strategies, this guide will equip you with the knowledge and tools necessary to take your content monetization to new heights.
So, if you're ready to unlock the full potential of your creative endeavours and establish lucrative partnerships with leading brands, let's dive into the world of Shopper.com and discover how you can harness its immense potential to fuel your success as a content creator.
How to Sign Up and Create an Account on Shopper.com
Creating an account an account on Shopper.com is very easy and absolutely free. The sign-up process is straightforward and can be completed in just a few simple steps.
Here's a breakdown of the process:
Step 1: Claiming Your Page
To claim your Shopper page visit https://www.shopper.com/ and in text bar enter a username in the text bar on the home screen.
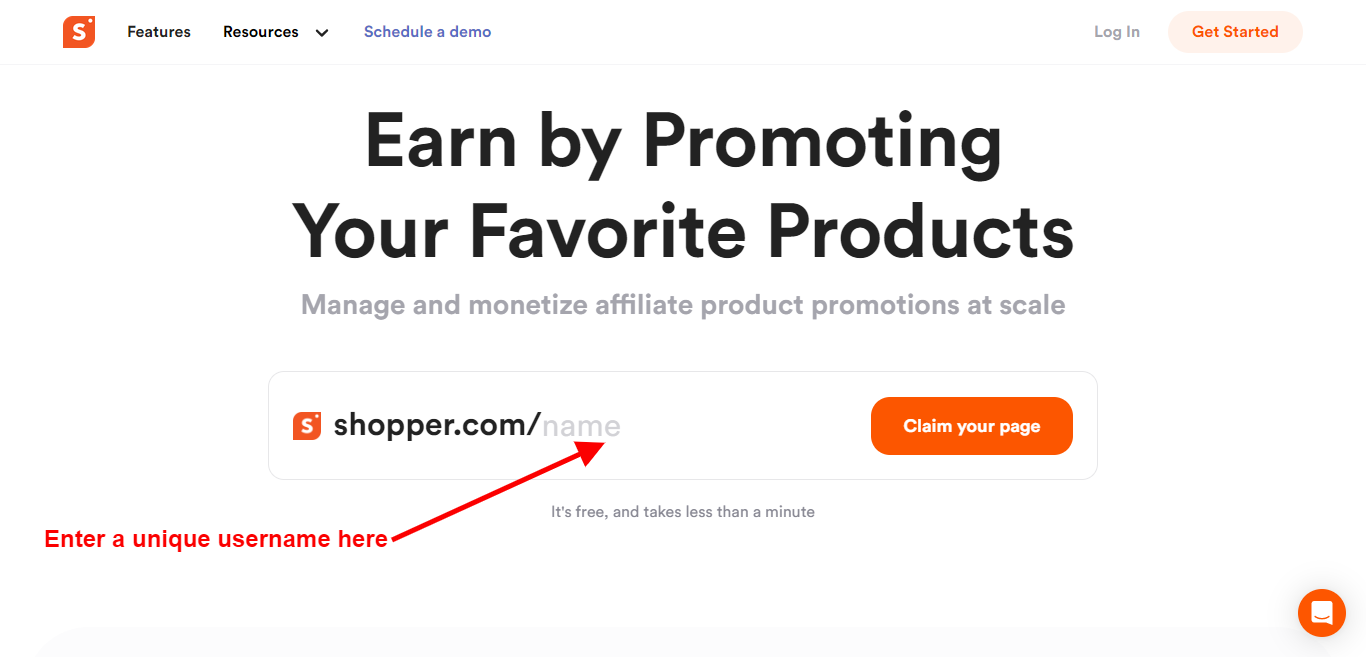
Remember you have to take a username that hasn’t been used before or used by any other creator. If you enter a username that is already in use you’ll see a prompt below the search bar saying, “Username is not available, choose another one” else it will say, “Username is available.”
Once you’ve chosen a unique username click on Claim your page, and you will be redirected to the Sign-Up screen.
Step 2: Sign Up
Once, you have chosen the username you’ll be redirected to a screen where you’ve entered some details to access your Shopper dashboard.
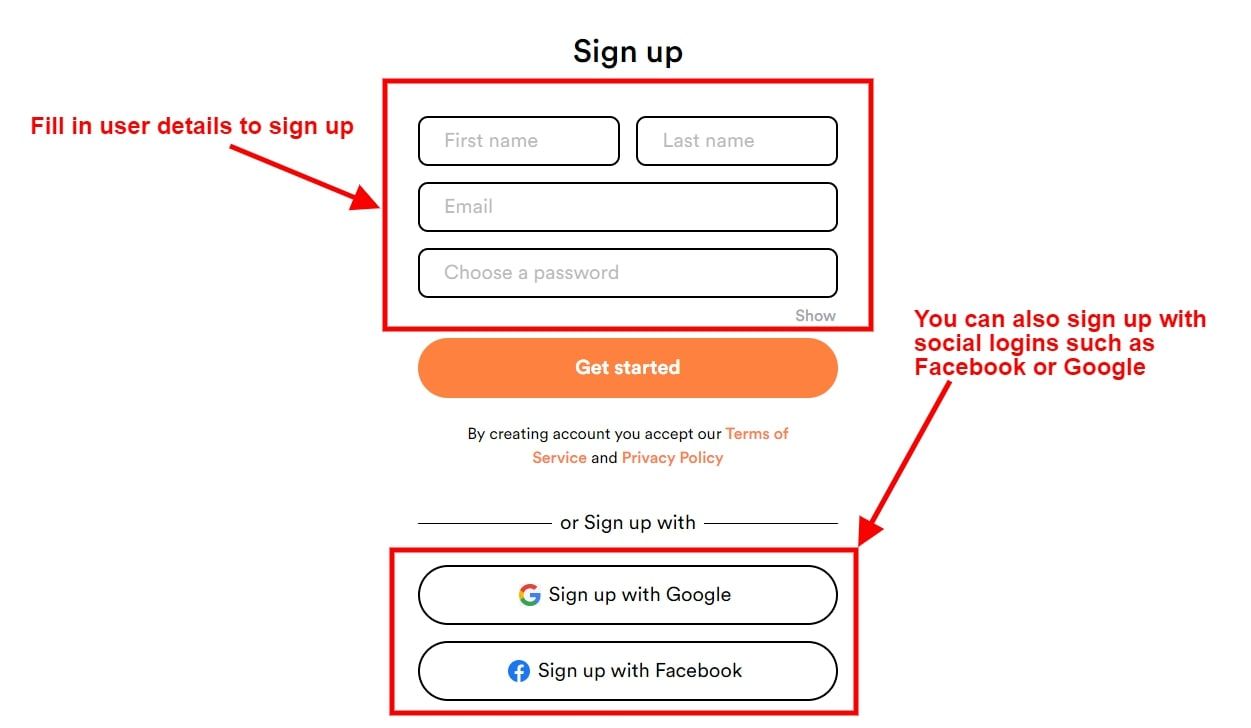
As you can in the above screenshot, you can sign up by entering some basic information such as first name, last name, email address, and new password. Alternatively, you can sign up with social logins such as Sign up with Google or Sign up with Facebook.
Step 3: Shopper.com Dashboard
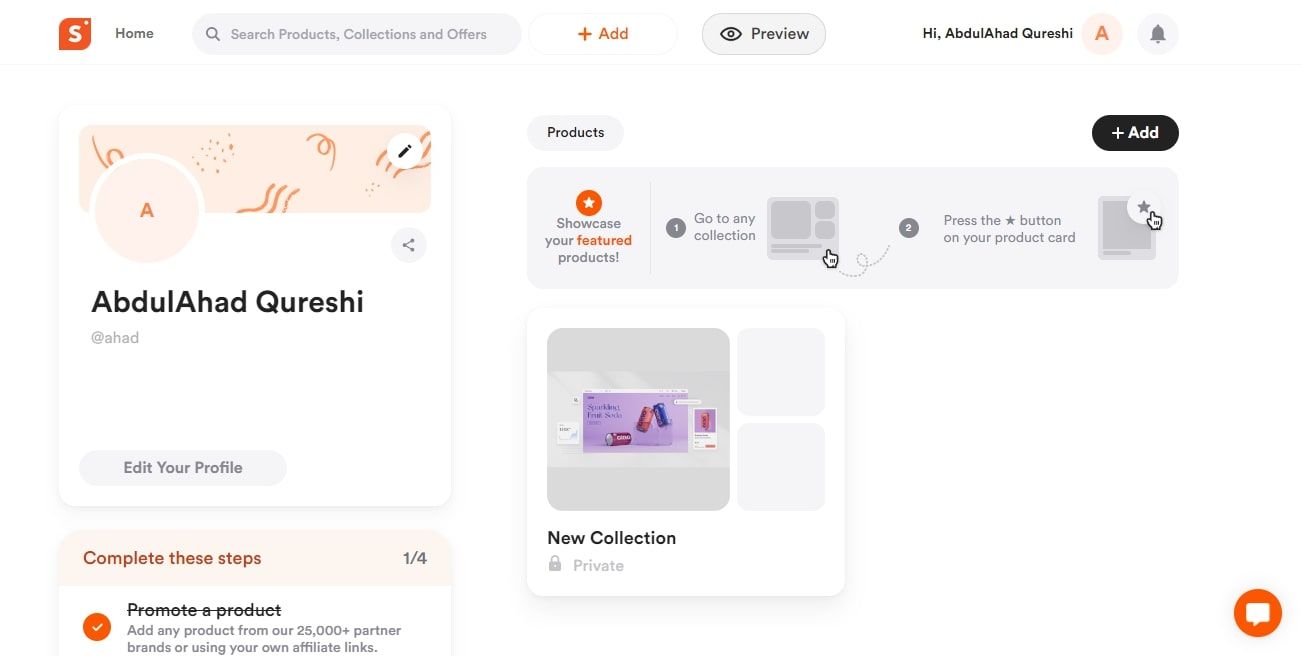
Once you’ve signed up and verified your email address, you can log in and access the dashboard. From this dashboard, you can add products, edit collections, customize your shopper page, and much more.
So as you can see the sign-up process for Shopper.com is not only quick but also incredibly user-friendly, requiring just three simple steps. Once you've successfully created your account, it's time to dive into the exciting world of product recommendations and affiliate commissions. Let's take a closer look at how you can add products to your Shopper page and generate affiliate links.
How to Add Products to Shopper Page?
There are two ways in which you can add products to your Shopper page and both ways are very easy to perform.
Method 1: Adding a New Product With Search
Here are all the steps for adding the products directly from the search bar:
- Login to your Shopper.com admin panel and click on the +Add button in the header.
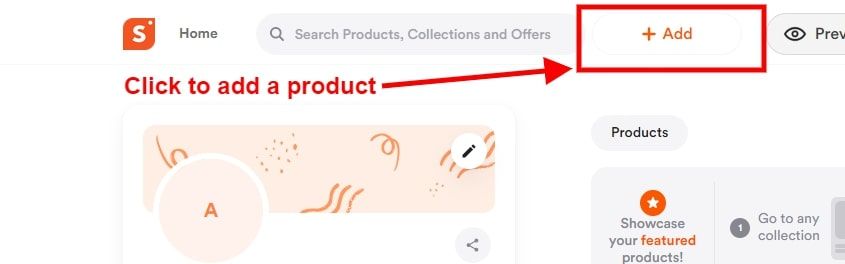
And choose the Product option from the drop-down menu.
2. You’ll see a search bar for adding a product. In the search bar type the product you want to recommend to your audience. For example, type “ nike air” and it’ll start showing you some suggestions.
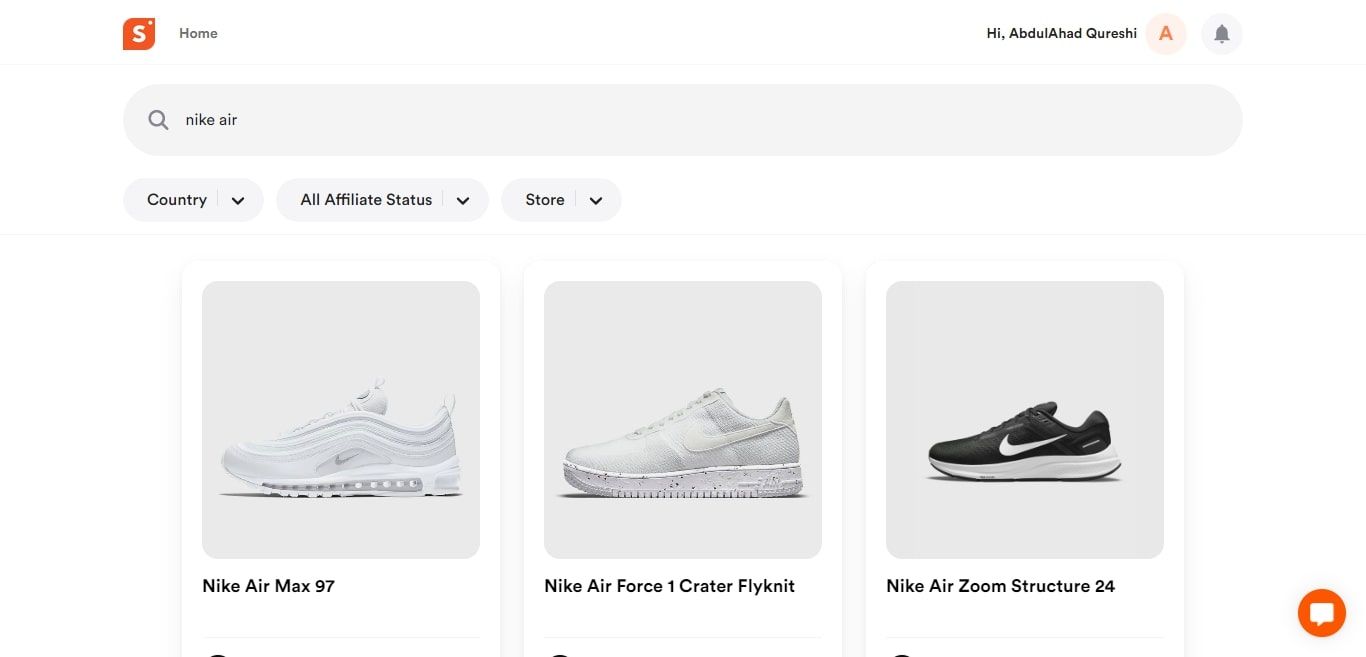
3. From the search suggestions the product you want to recommend and earn affiliate commissions upon a sale. You can also filter the search results with Country, Affiliate Status, and Store filters.
Here are the details of the filters:
Country - Use this filter to sort your search results by country. Select the country you want to find a store from and only results that are available in the country will be shown.
Affiliate Status - Use this filter to sort your search results by affiliate status. You can search for products with affiliate status enabled or disabled.
Store - Use this filter to find products from a specific brand or merchant. When you click the drop-down of this filter, you will get a search field where you can enter the brand name.
If the brand or merchant works with us, you will see their store listed. If they don’t appear, you will need to add the product with the product URL which is the second method.
4. Finally, you’ll be redirected to the product screen.
Method 2: Adding a New Product With a Product URL
While the first method is a part of our latest platform updates, the second method is the conventional method. Follow these steps to add your favorite products on your Shopper page with the Product URL:
- Again, click on the +Add button and choose the Product option from the home screen of the admin panel.
- You’ll be shown the same search bar as in method 1. Now instead of typing the product name you can directly copy and paste the exact URL from a store.
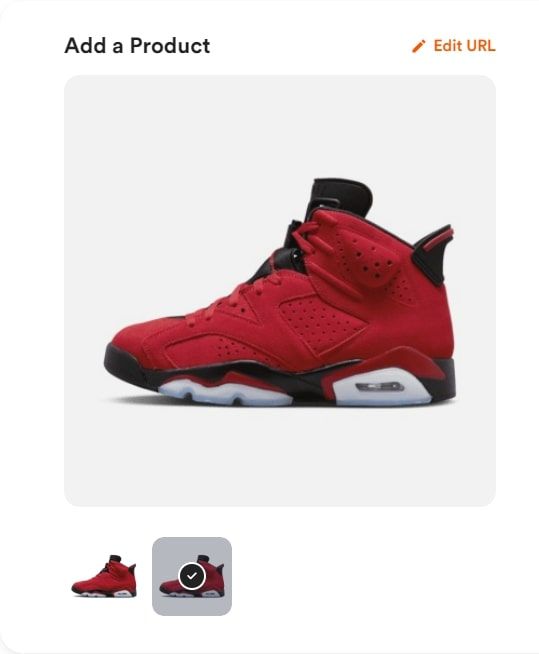
For example, you want to add Nike’s Air Jordan 6 Retro to your shopper page. Visit Nike’s official website, find the product, and copy the product URL. Finally, you paste the URL in the search bar.
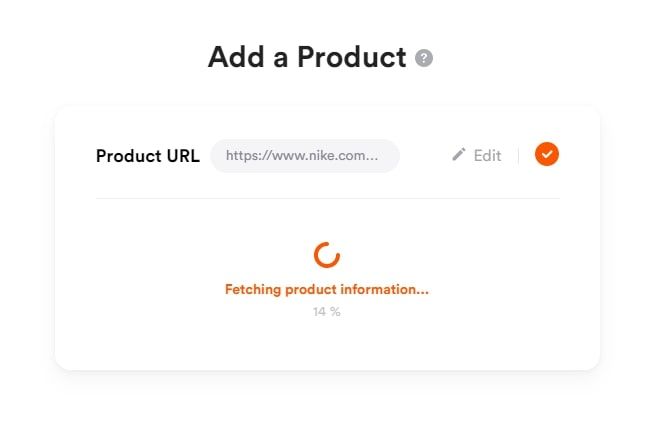
As you can see the platform will automatically fetch the product from the URL.
3. Finally, you’ll be redirected to the edit product page, where you can enter important details.
Edit Product Page
Whether you add a product from Method 1 or Method 2 you’ll be redirected to the product edit screen, where you have to enter some important details.
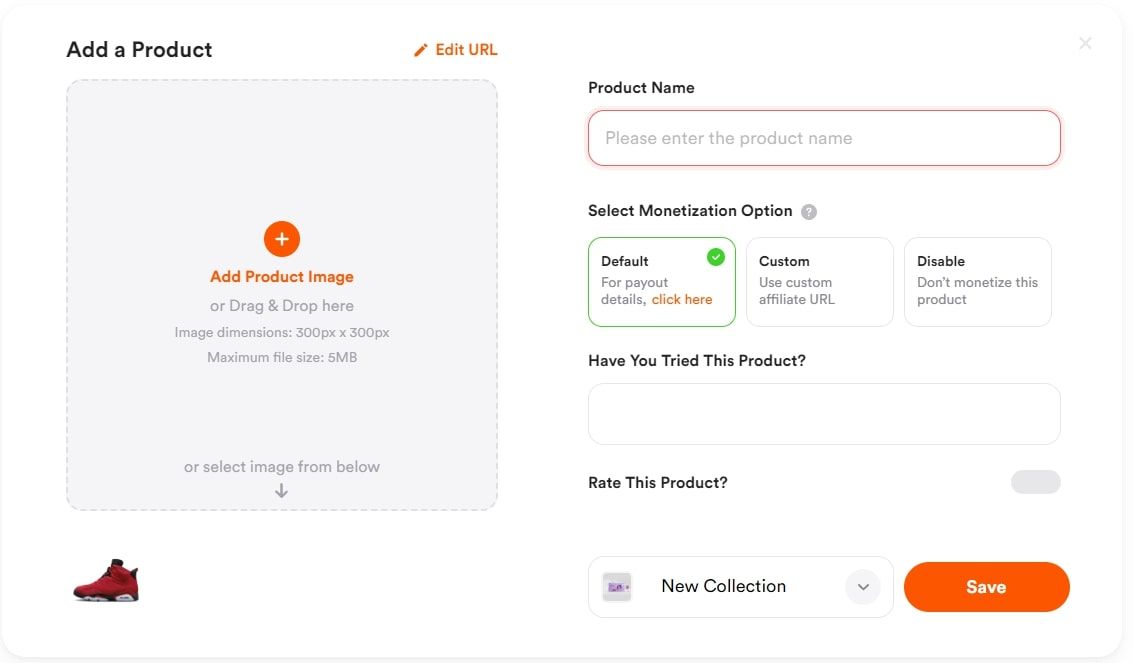
You have to enter the following details:
Product Image
Add appealing images of the product. Ensure the image justifies the important details of the product.
Product Name
Enter the name of the product.
Select Monetization Option
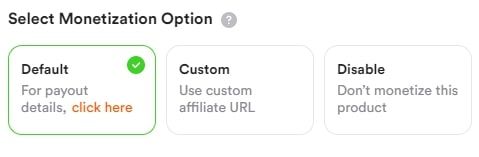
Creators have multiple options to monetize the product they recommend. Here is a quick look at the different options you have:
- Default: This option is highly recommended by us. Choose this option if you want to showcase products and make some extra bucks out of it. If the option is selected, you’ll be rewarded with a percentage of the total order value per sale.
- Custom: If you’ve signed up for a specific affiliate program, choose the Custom monetization option. You can enter the specific URL generated by the affiliate program you’ve signed up for.
- Disable: Don’t want to monetize the products you are sharing? Choose the Default monetization option as a result, the link will not generate any affiliate revenue for a successful conversion.
Product Description
Next, you have to enter a relevant product definition under the text bar under the “Have You Tried This Product?” option.
Rate This Product
Enable this option if you want to allow your audience to rate this product if they purchased from your link.
Collection
If you want to add a product to a specific collection, that can be done too from the product edit screen.

Collections help in grouping related products under one name. Let’s see how you can add and configure collections in Shopper.com
Adding Bulk Products
If you want to add products in bulk you can do this by uploading a CSV file having the list of your products. (Click HERE to download a sample product CSV file.)
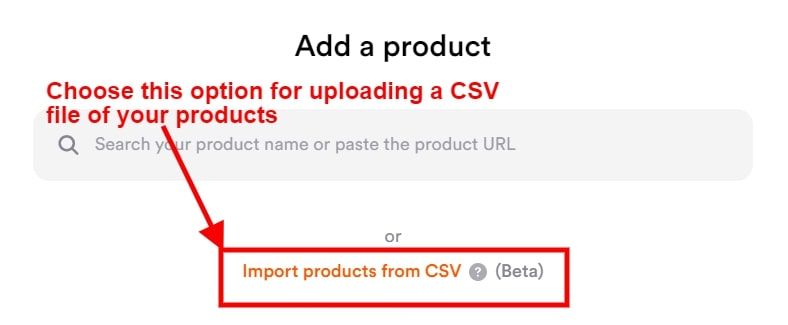
As you can see in the above screenshot, the option for importing the product CSV file is right below the search bar where you were searching for the products using method 1 and method 2.
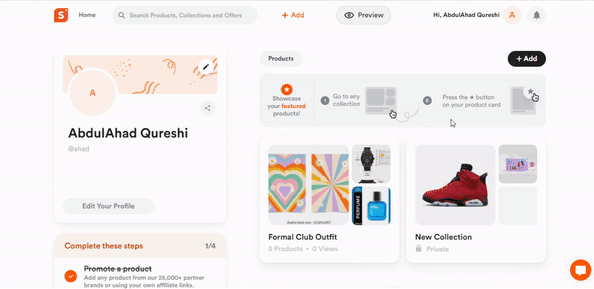
Collections
One of the most impressive innovations of Shopper.com is the collection feature where a creator can organize the products into a group. For instance, you want to share the complete summer party outfit with your audience. You can create a collection named “My Summer Wear” with products like floral shirts, sliders, shorts, sunglasses, and deodorant.
As you can see creating collections makes personalizing and organizing products in your Shopping store. Let’s see all the steps that you have to follow for creating a collection and adding products to it.
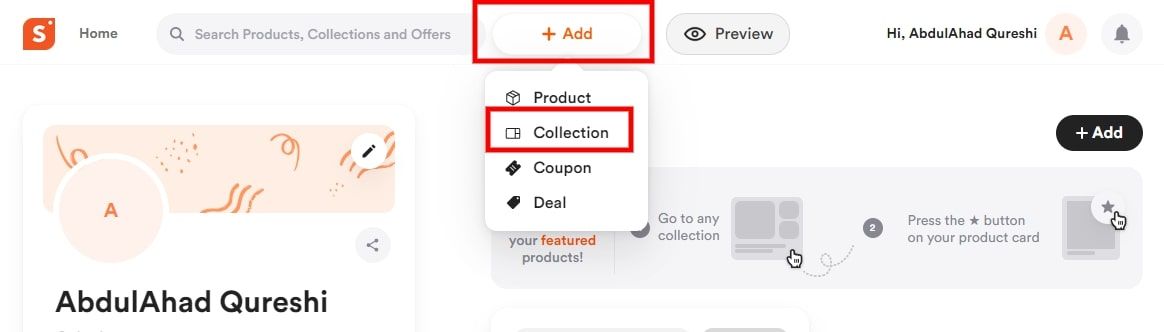
Step 1: Creating a new collection
For adding a new collection visit the home screen of your Shopper’s admin panel and click on the + ADD button on the top. From the drop-down menu choose the Collection option.
For adding a new collection you need to fill in a few important details, it includes the following:
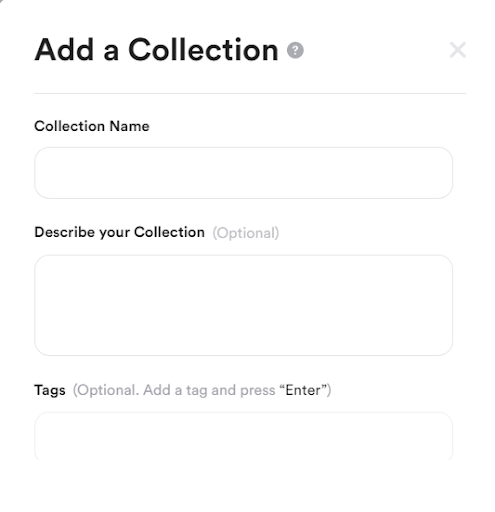
Collection Name
This is compulsory. The collection name specifies the exact term of your collection. For example, Club Night Outfit, My Summer Drop, etc.
The name of the collection should accurately reflect the content or theme it contains. This way, users can easily find the specific product they're looking for without having to sift through numerous unrelated items.
Description
Although this field is optional, we highly recommend adding a relevant description for your collection. Including a brief description of what contents a user can expect to see in the collection.
Tags
Include a maximum of three tags to entice individuals to the product you are showcasing. Consider three tags that individuals would search for to discover your content and ensure maximum clicks on the relevant products.
Step 2: Customizing Your Collection Page

Once, you have created a new collection you’ll be redirected to an edit screen where you can make customizations to the appearance of your collection page.The ideal dimensions required for the collection's cover image are as follows:
- For landscape images Width: 1120 px - Height: 500 px
- For portrait images Width: 400 px - Height: 500 px
Shopper provides two default visibility options for users, and these can be customized as needed. By default, all collections are set to public, but you can modify this setting based on your requirements.
For instance, you can update the cover photo of your collection page and make it look more interactive and exclusive.
So this is how you can upload products to your Shopper page and group them into a collection. Finally, you can share the links generated by your Shopper.com with your audience and monetize your content.
Now let’s see some of the key features that the platform has to offer for managing your affiliate links.
Prominent Features of Shopper.com for Affiliate Marketers
Users of the platform get some exclusive features with the help of they can:
- Easily manage their affiliate links.
- View and optimize the performance of their affiliate marketing campaigns.
- Personalize their Shopper.com page.
Let's see some of these features in detail.
1. Customizations
As you know with Shopper.com you can create a fully-functional affiliate marketing website where you can completely customize your pages.
Shopper.com offers some theme options that can be customized as per the requirements. Apart, from themes there are other customization options as well, let’s have a look at all of them.
To access the design options, navigate through the following steps
- Firstly, from your admin panel hover over your username in the header and click on the Appearance option.
Now you just have to choose the customization option you want to work upon. As a user, you get the following options:
Themes
Creators get the option to choose a theme for their Shopper profile, Collection, and Product pages. The platforms provide a few theme options that you can choose and customize as per your requirements.
Follow these steps for revamping your pages:
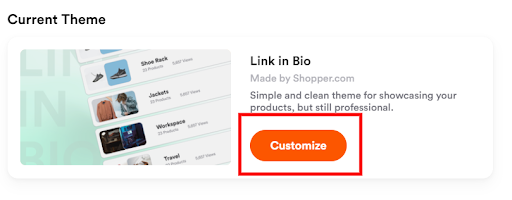
- If you are in the Theme section of the Appearance page, you’ll find two categories - 'Current Theme' which is the theme you’re using, and 'All Themes' are the other options than the current theme.
- Click on 'Customize' to personalize the active theme further.
- The theme editor will open, offering various customization options.
- Locate the 'Theme Settings' menu at the top right corner and click on it.

- With Theme Settings, you can customize the page background, select a primary color, choose a light or dark theme, and enable or disable view count.
- Use the 'Page' drop-down menu at the top left corner to switch between the home page, product page, and collection page to preview the theme appearance.
- Once you are satisfied with the customization, click on 'Publish Theme' to save your custom theme.
Navigation

A Shopper page is more user-friendly when it has menus and links for customers to navigate easily. You can easily customize the header and footer for your Shopper website and make the pages more user-friendly.
To edit the header and footer choose the Navigation option from the appearance section and follow these steps:
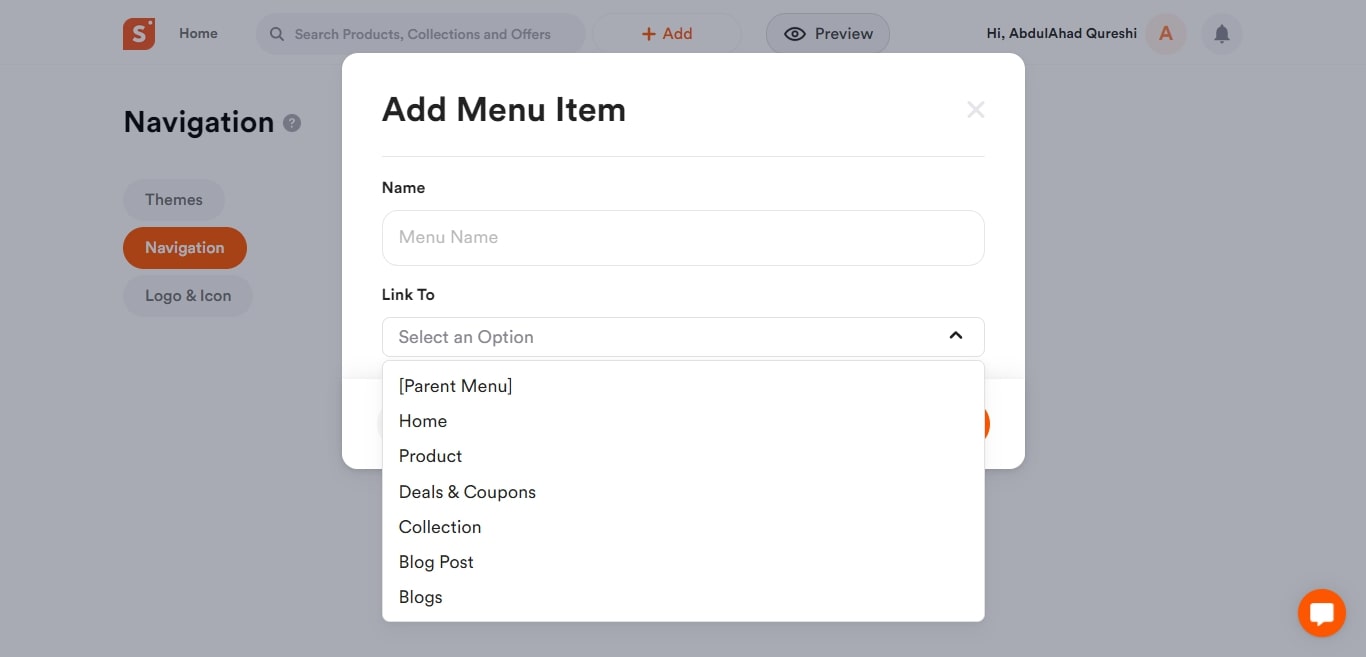
- To add a new menu item, click on the "Add Menu Item" option.
- You have the option to create a parent menu by selecting the "Parent Menu" option, and you can link child menu items to it.
- Choose from a variety of options such as -
a. Home (link to the homepage)
b. Product (link to the product page)
c. Deals & Coupons (link to the deals and coupons listing page)
d. Collection (link to the collection page)
e. Blog Post (link to a specific blog post)
f. Blogs (link to the blog homepage)
g. Page (link to an internal page)
h. External Link (link to an external URL)
4. Repeat the process as needed to add more menu items.
5. By following these steps, you can create a personalized menu on your Shopper page, linking to different pages based on your requirements.
For editing the footer just select the “Footer Menu” tab and repeat the aforementioned steps.
Logo & Icon
Shopper.com offers the flexibility to utilize a custom favicon on your Shopper page, allowing you to elevate your identity and branding to new heights. Just choose the Logo & Icon option in the Appearance section and upload the images for your logo and favicon.
Note: For gaining access to these configurations you’ll need to have a premium account.
2. Tag a Coupon or a Deal to Products
If you have a product with a discount code, deal, or limited offer that you want to add, Shopper provides the option to tag it to the corresponding product.
To tag a coupon or deal to a product, the coupon/deal must be added to Shopper first. Our team will review the coupons and add them to your product accordingly. Let's take a look at the steps for submitting coupons.
How to submit a coupon?
Here are the steps for submitting a coupon to Shopper.com associated with a store:
- Login to your Shopper.com account and press the +Add button on the home page of your admin dashboard.
- Choose the Coupon option from the drop-down menu.
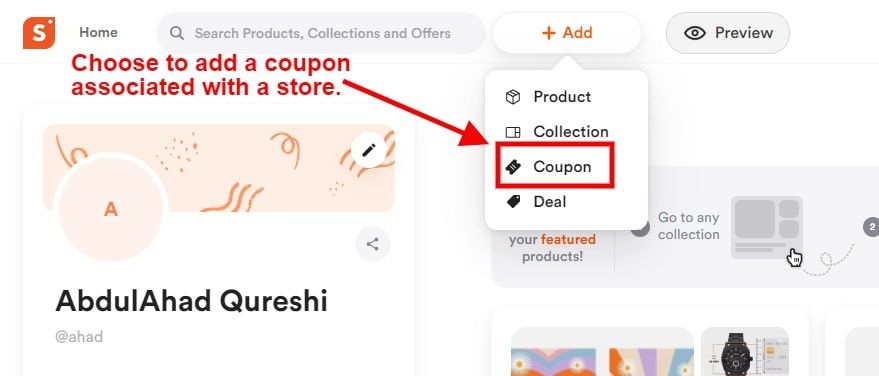
- Upon clicking the Coupon option you’ll be redirected to the coupon submission page. On this page, you’ll have to enter a few important details.
- To begin with, you have to enter the following details:
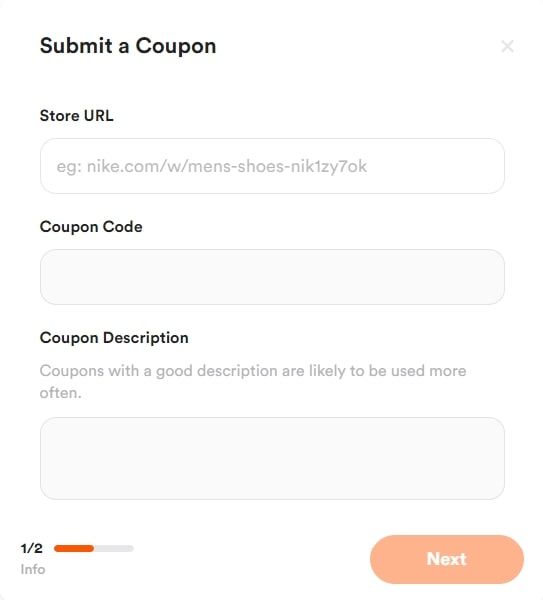
Store URL: Enter the URL of the store for which you have the coupon.
Coupon Code: Enter the coupon code for your followers.
Coupon Description: Enter the description of your coupon. Coupons with a good description are likely to be used more often.
- Once, you have entered all the details, press the next button. You’ll be asked to upload an image for your coupon. Although, this is optional but is highly recommended for faster approval.
- Lastly, you can enable the Expiration Date option if the coupon expires after a certain date.
So this is how you can submit a coupon for a store to Shopper.com.
How to submit a deal?
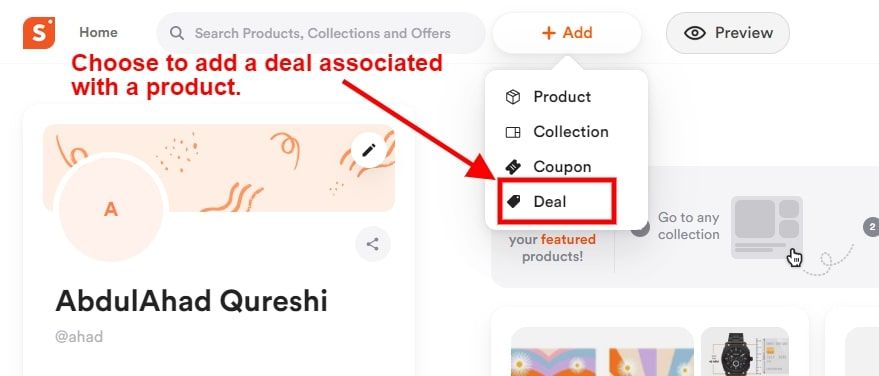
Here are the steps for submitting a deal associated with a product:
- Login to your Shopper.com account and press the +Add button on the home page of your admin dashboard.
- Choose the Deal option from the drop-down menu.
Next, you have to enter the deal URL and hit the continue button.
- You’ll be redirected to the Deal edit screen where you’ve to enter the following details:
Deal Title: Enter a to-the-point deal title for example $50 on Apple Watch Series.
Deal Description: Describe your deal, it is an optional field. Deals with a good description are likely to be used more often.
Expiration Date: This option is applicable if the deal is available for a specific duration.
Finally, click on the Submit button.
So this is how you can submit coupons and deals to Shopper.com but we haven’t tagged them to a product yet. Now, the next step is to tag deals and coupons to your products.
How to tag a deal or a coupon to a product?
When a product in your collection is accompanied by an additional discount or offer, users are more likely to make a purchase as it increases their savings.
To achieve this, follow the steps we discussed earlier for adding a product until you reach the product description page. On this page, you will need to include the discount coupon that is associated with the product you wish to tag.
Once you have added the coupon, ensure that you copy the coupon URL for future use. Follow these steps to tag an offer to the product:
- To tag an offer, either add a new product or edit the existing product you want to tag.
- Provide the necessary details such as the product name, monetization option, and product review.
- Make sure you have copied the coupon URL beforehand (if you haven't already).
- Open a new tab and navigate to your Shopper profile. Click on the "Deals" tab.
- In the "Deals" section, you will find a list of all the coupon codes and deals you have added to your profile.
- Choose the desired coupon by either clicking the "Copy Coupon Code" option or utilizing the share symbol. Alternatively, scroll down and click the "Copy Link" option to copy the coupon URL.
- Return to the product description tab and click on the checkmark icon for "Add a Coupon or Deal."
- Paste the previously copied coupon code URL into the designated field.
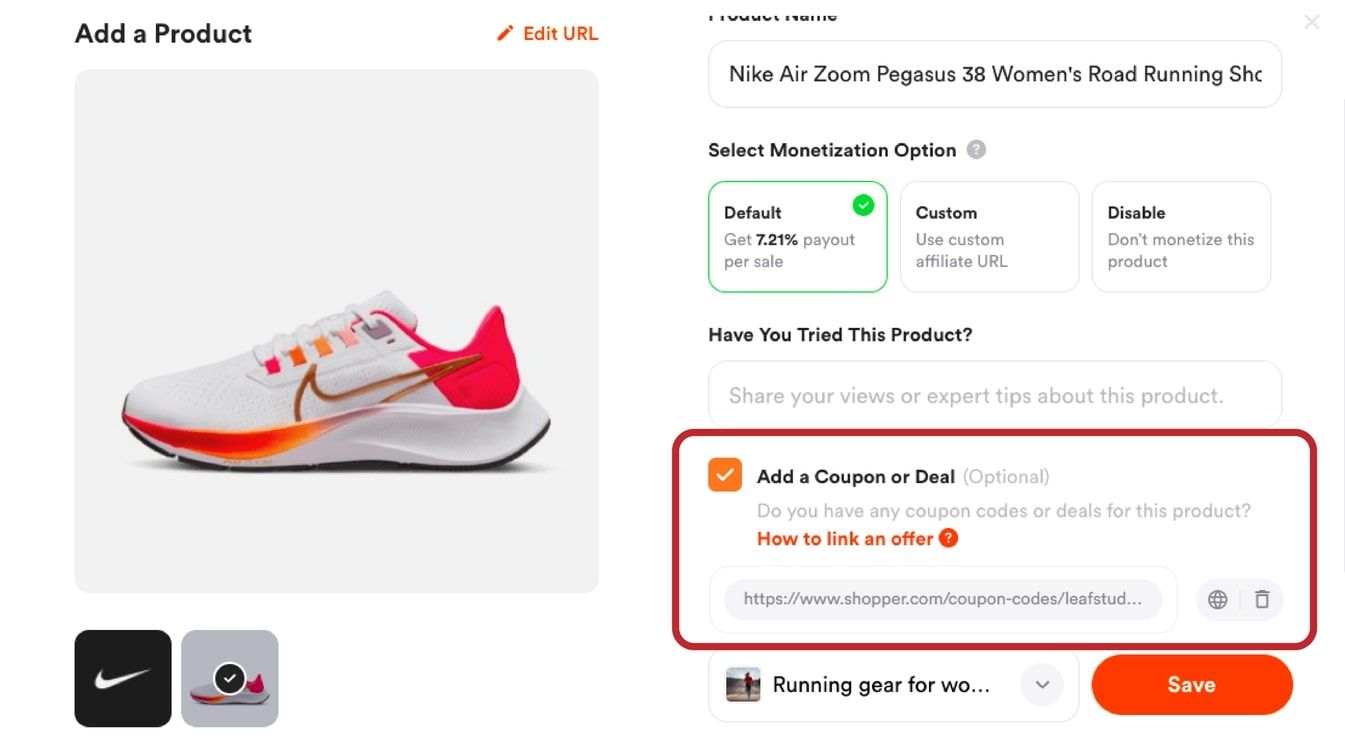
- By following these steps, you will be able to successfully tag a coupon or deal for your product.
3. Broken Link Notifications
Having affiliate links or products break is one of the main problems marketers face when promoting products. This can lead to severe revenue loss and bad user experiences.
Shopper provides you with the best possible solution to this issue which alerts you whenever an affiliate link or product URL breaks.
Whenever an affiliate link breaks or stops redirecting users to the product page, you will now be notified on your Shopper profile that your affiliate links have stopped working properly.
Please note that in order to enable link break notifications on your account, you must have the Creator or Creator Plus plan.
4. Analytics
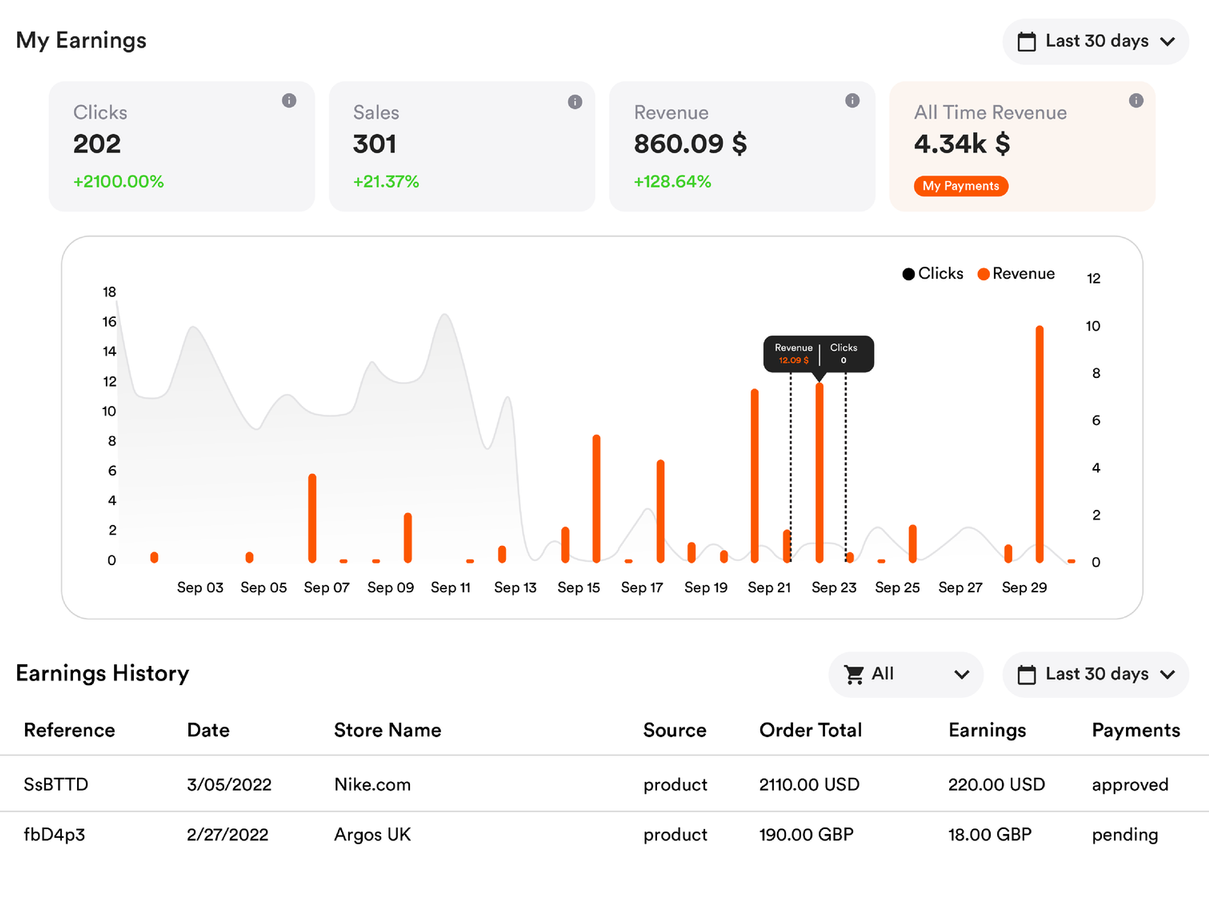
At Shopper, we understand the significance of in-depth analytics in expanding affiliate marketing endeavors. As a result, our platform features a dedicated analytics dashboard that provides a comprehensive report on the following metrics:
- Earnings
- Traffic
- Clicks
- Sales
- All-time revenue
These statistics are presented in a clear and concise manner, offering visual summaries through graphical representations for each overview.
For accessing the analytics dashboard login to your Shopper admin panel and hover over your profile name on the top. Then click on the Earnings option as shown in the screenshot above.
5. Custom Domain

Shopper allows you to include your own personal or custom domain, enabling you to consolidate all your product recommendations and collections in a single location.
However, it's important to mention that you must have a subscription to either the Creator or Creator Plus paid package on Shopper in order to utilize this feature.
Moreover, if you have a custom domain, you also have the option to add a personalized logo to your website and customize the color themes according to your preferences.
How to Setup a Custom Domain with Shopper.com?
Follow these steps for adding a custom domain to your Shopper profile:
- Log in to your Shopper profile and hover over your profile name on the top and choose the Settings option.
- Next, choose the Custom Domain under the Store section from the side menu.

Update your DNS settings. Click Here to view the detailed documentation of the custom domain.
- Lastly, verify your domain connection
- Finally, your domain name will be added.
If you are still facing any problems with Custom Domain configuration, please feel free to contact our team at support@shopper.com.
Blogging with Shopper.com
Shopper.com has an inbuild content management system that allows you to create a blog for sharing your thoughts. With this feature, you can create rich content for attracting organic traffic to your Shopper.com.
Also, remember users only with Creator or Creator Plus accounts can enable the blogging feature. To enable and publish blog posts on Shopper.com, please follow these steps:
Enabling the Blog
- Log in to your profile page and hover over your profile icon located at the top right corner.
- From the dropdown menu, select "Settings."
- On the "Settings" page, navigate to the "Store" options and click on "Blog Settings."
- Move the slider for "Enable Blog" from grey to orange to activate the blog feature.
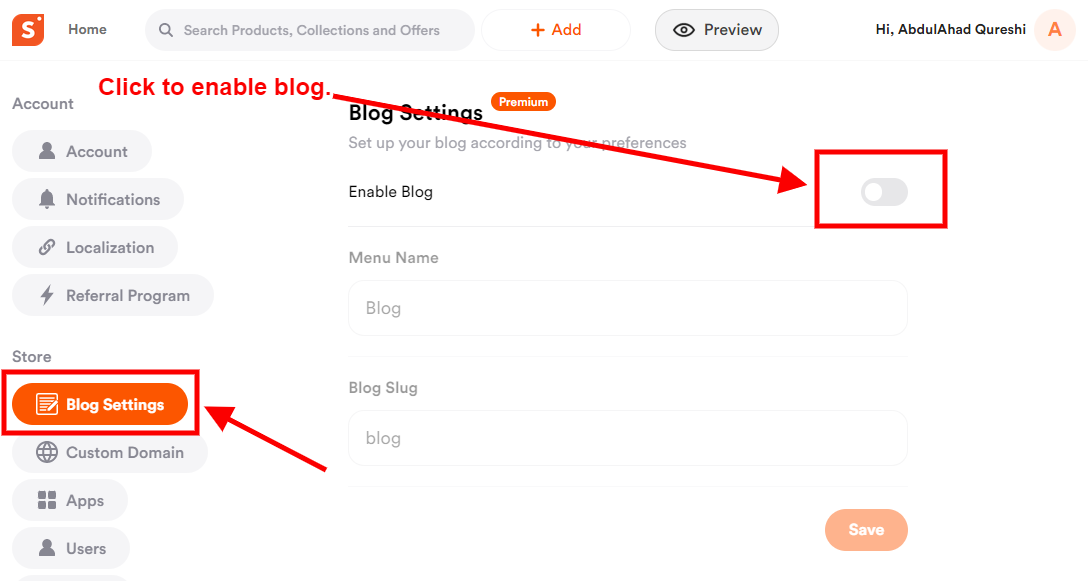
Once the blog is enabled, you can customize the following options:
- Menu Name: Enter the desired name for your store's menu, which will appear as the header (H1) of your store.
- Blog Slug: Customize the website address of your blog by adding a blog slug in the blog settings menu.
After making the necessary changes, click on "Save" to confirm the modifications.
Adding New Blog Posts
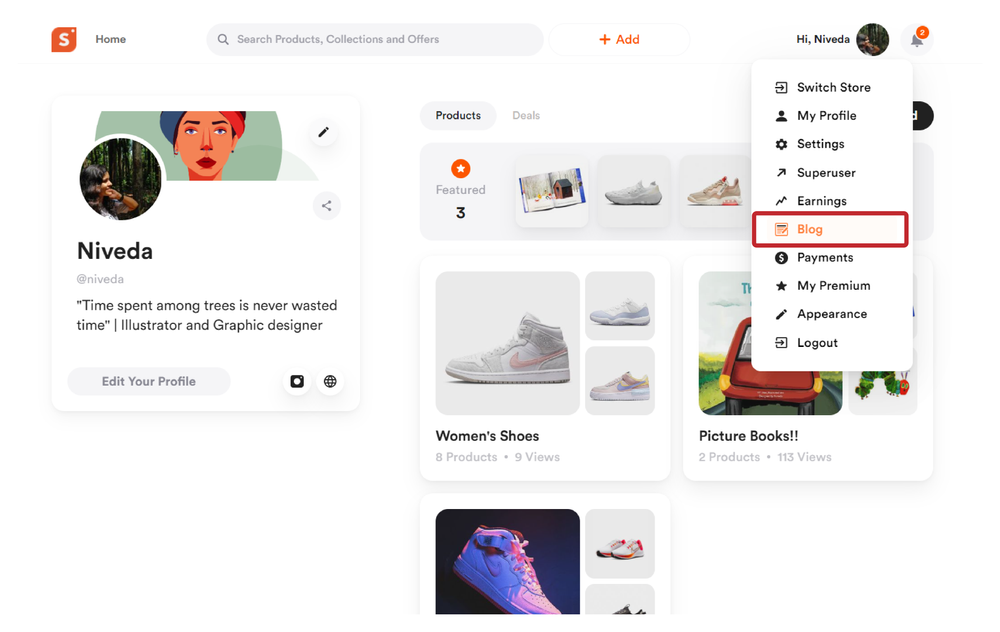
After enabling the blog, access your blog by hovering over your profile icon and selecting the "Blog" option from the dropdown menu, and following these steps:
- Clicking on the "Blog" option will take you directly to your blog's editor.
- To create your first blog post, click on the "New Post" option located at the top right corner.
- In the blog editor, you can input text, embed content such as images, videos, HTML, and more.
- Choose to publish the post immediately, save it as a draft, or schedule it to be published at a later time.
By following these steps, you can enable the blog feature on Shopper.com and easily create and publish new blog posts for your audience.
Shopper.com for WordPress

Shopper.com has recently launched an innovative solution for the WordPress community.
By utilizing the Shopper.com WordPress plugin, you have the capability to seamlessly incorporate your Shopper.com store into your WordPress blog or website. This integration allows you to conveniently launch your Shopper.com store directly within your WordPress site by inputting the necessary Shopper.com API details.
Please follow the step-by-step installation documentation to install and implement the features of the plugin on your WordPress website.
Amazon Link Localization
Shopper.com enhances your earning potential by localizing the Amazon store based on your visitors' location. This powerful feature allows you to cater to a specific audience by tailoring the shopping experience to their geographical location.
The localization feature is particularly beneficial for the most popular Amazon stores, namely the United States (US), the United Kingdom (UK), and India. With this capability, you can provide a more personalized and relevant shopping experience for your visitors, thereby increasing the likelihood of conversions and driving higher revenue.
Zapier Integration and API
Shopper.com can be easily connected to Zapier which allows you to automate your work across thousands of apps. Here's a step-by-step guide to exporting your subscribers to different tools using Zapier:
- Log in or create an account on Zapier.
- Navigate to "My Apps" from the top menu bar.
- Click "Connect a new account..." and type in "Shopper.com."
- You need your API details to connect your Shopper.com account to Zapier. You can find your API details from your Shopper settings page.
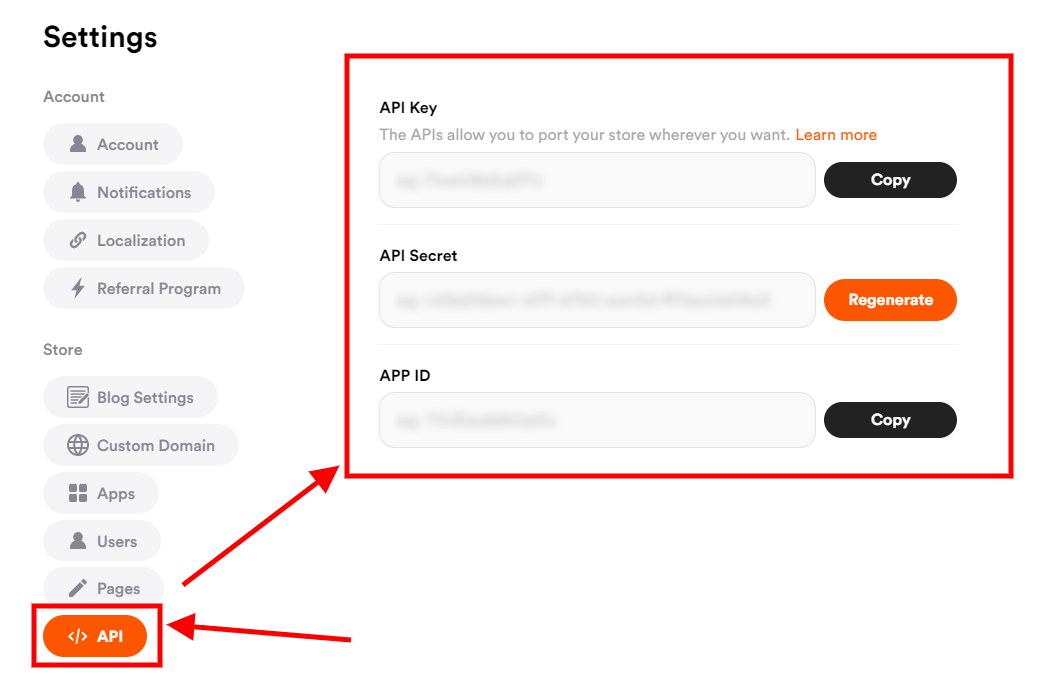
5. Once you enter your API details you can start creating an automation.
You can either use pre-made templates or create your own with the Zap Editor.
Connecting Apps with Shopper.com
Looking to track visitor activity on your Shopper website? Look no further than connecting Google Analytics to supercharge your analytics capabilities. By seamlessly integrating Google Analytics, you can gain valuable insights into the performance and behavior of your website visitors.
But that's not all - Shopper offers you the opportunity to connect with a vast array of other applications, empowering your Shopper account with even more functionality. Whether you're seeking automation tools, utility apps, or eCommerce enhancements, you'll find a diverse range of apps available for integration.
To explore the full spectrum of available apps, simply navigate to the Apps section on the settings page of your Shopper.com account. Here, you'll find an extensive list of applications at your disposal. Furthermore, we consistently add new apps to this growing list, ensuring you have access to the latest and most innovative tools to enhance your Shopper experience.
Conclusion
In conclusion, getting started with Shopper.com opens up a world of opportunities for content creators looking to monetize their affiliate product promotions at scale. With a simple and straightforward sign-up process, you can gain access to over 25,000 affiliate partnerships with renowned brands.
Once you've created your account, it's time to dive into the platform's features. From adding products and generating affiliate links to customizing your Shopper page with themes and menus, Shopper.com provides a user-friendly interface to manage and showcase your content effectively.
Furthermore, Shopper.com understands the importance of analytics and provides a dedicated dashboard to track crucial metrics like earnings, traffic, clicks, sales, and all-time revenue. This enables you to make informed decisions and optimize your affiliate marketing efforts.
Additionally, Shopper.com offers valuable features such as custom domains, personalized logos, and the ability to tag discounts and deals to products, enhancing your branding and attracting more customers.
With Shopper.com, you have the power to elevate your affiliate marketing game and increase your revenue potential. So, don't wait any longer—take the plunge, explore the platform, and embark on your journey to monetize your content like never before.
Before we end make sure to check our compilation of helpful documentation for detailed technicalities of all the features and configurations.